Managing Images
When you start a resource in Saturn Cloud, you may require special libraries or customizations for your work. The way to ensure that these all get installed when the machine is spun up is by using images. An image will contain the instructions that explain all the libraries and tools you want installed before you start work.
When starting out with Saturn Cloud, most people will use one of our standard images, which provide most data science packages you will need. However, if (for example) your company has a designated Docker image, you can use that instead!
Using a Saturn Cloud image
You can choose from a Saturn Cloud image when you create a resource. Saturn Cloud has a selection of images available depending on your use. There is a standard CPU image as well as GPU instances with different sets of libraries like RAPIDS or PyTorch.

Build a Custom Image
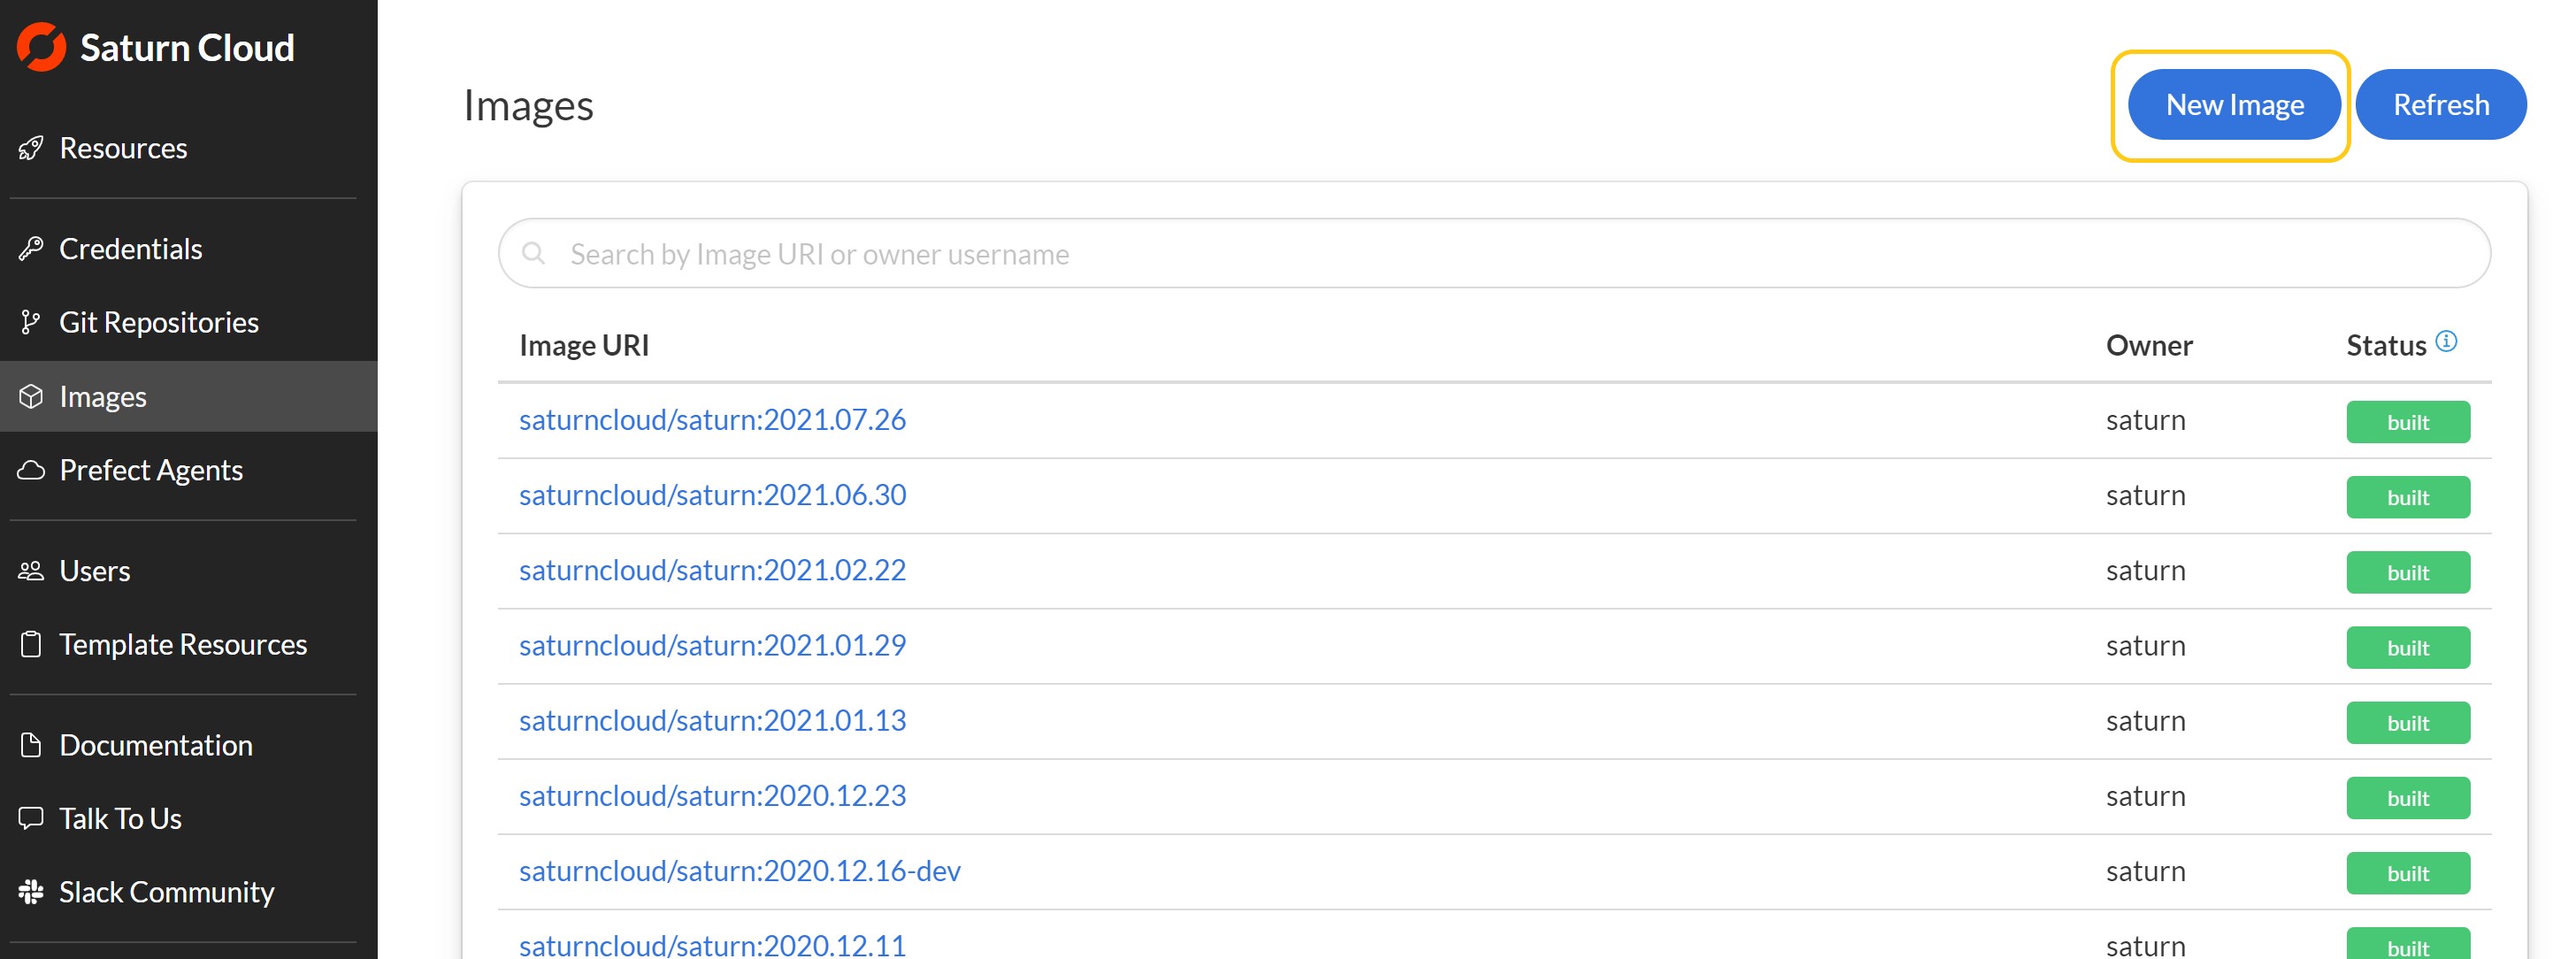
To build your own image, select the Images tab in Saturn Cloud. From here, you’ll see the blue New Image button at the top right of the screen. Click this, and you’ll be taken to a form.

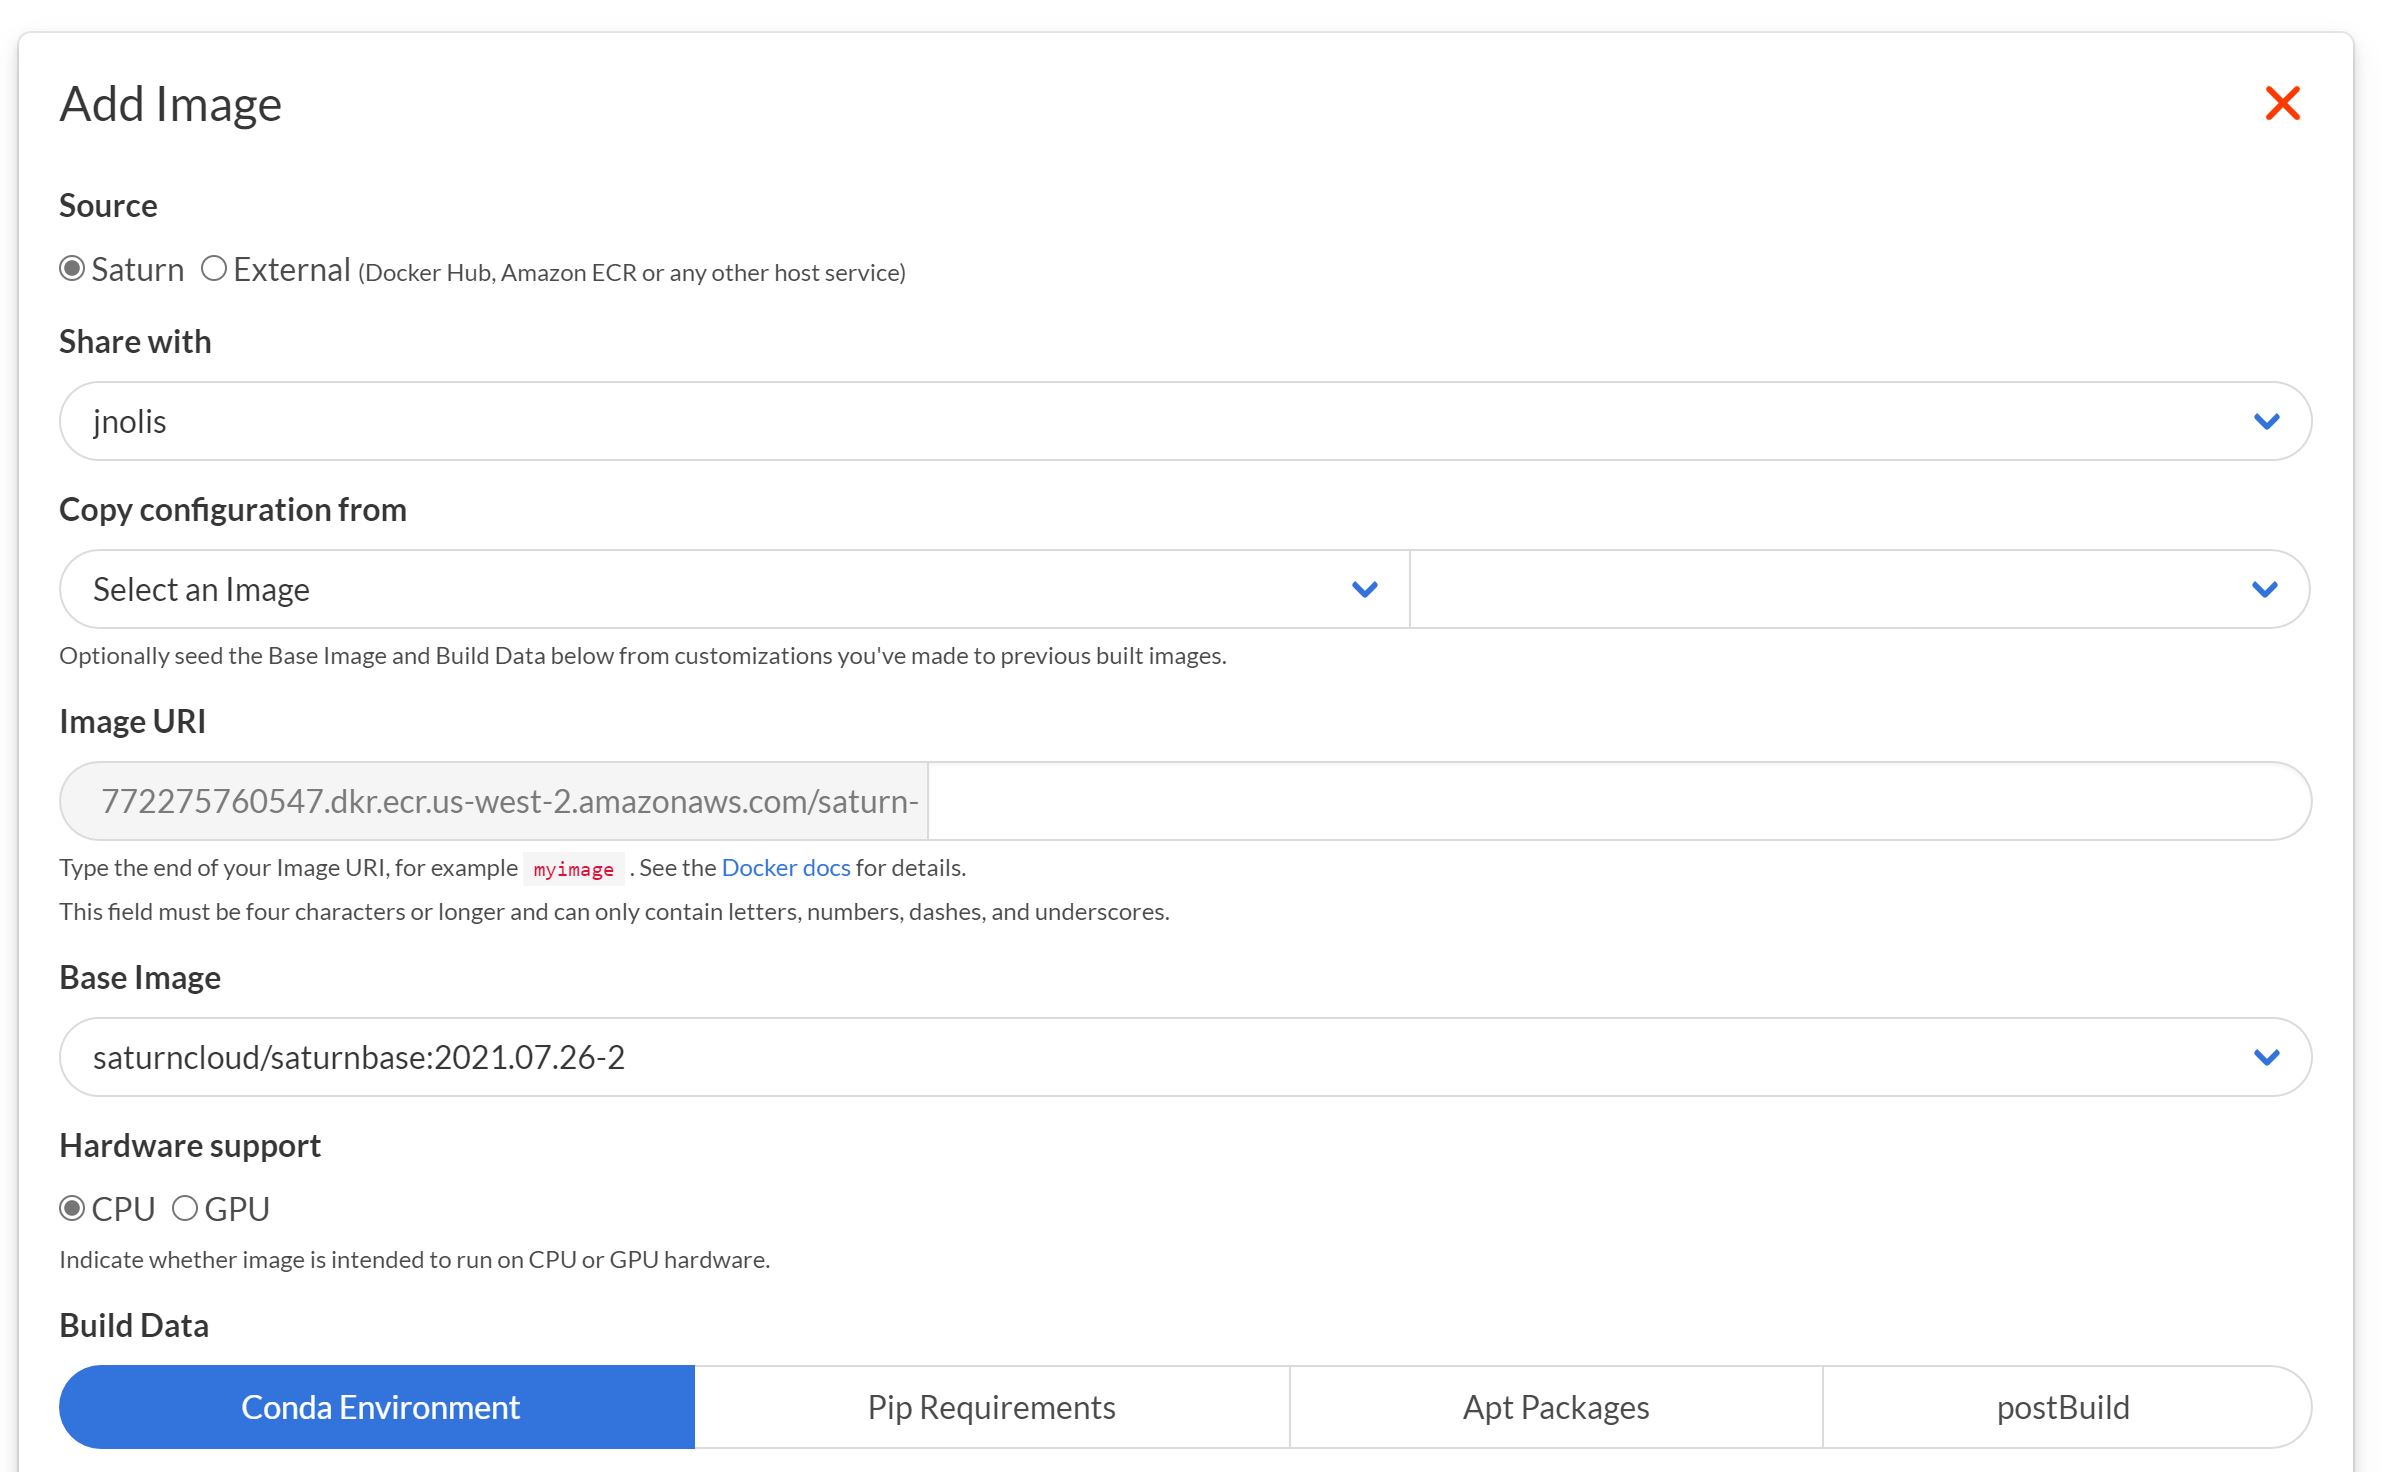
In the first half of the form, you will choose the source of your Docker image. If your image is hosted somewhere else, and you have a link to it, select “External” and the form’s contents will change to look like this. Otherwise, leave this box as “Saturn”, even if you are going to be filling in your own image specifications.

Import an External Docker Image
If you’re adding a Docker image that already exists in your personal or business repository, fill in the correct Image URI that leads to your image. If you don’t know what this is, let us know or consult with your image hosting system.
Create an Image within Saturn Cloud
If your image is not externally created, you can create it yourself within Saturn Cloud by specifying which libraries and packages you want in it. You can also use a bash script if you want to manually specify the exact steps of image creation.
Here are the options when creating an image within Saturn Cloud.
- Share with: Admin users can elect to share the image with any user in Saturn (including your whole company)
- Copy configuration from (optional): If you’ve already built an image, this drop down lets you load that configuration, so that you can modify it, and do a new build.
- Image URI: The name that will be given to the image after creation.
- Base Image: The starting point for the image you are creating. If unsure, use the most recent Saturn Cloud image for GPU/CPU.
- Hardware Support Whether the image will work on GPU or CPU instances. If you have not requested libraries specially designed for GPU computation, then CPU is usually the right choice.
- Build Data: Saturn knows how to build images using a few configuration file types. More information is available from repo2docker.
- Conda environment: Things you would add to an environment.yml file
- pip environment: Things you would add to a requirements.txt
- apt get: a list of apt get packages
- postBuild: a bash script that is executed in your Docker container after everything else has been run
Replicate a Conda Environment
One powerful configuration option is to use a custom conda environment. To do this, in the Build Data section, paste in the YAML describing an environment. If you have an existing conda environment you use locally, you can run conda env export –no-builds to generate this YAML file.
When you build an image from scratch like this, it generates a brand new Python environment. These are not modifications of Saturn’s default images, so you must include all the packages you’re going to want to use.
Click Add when you have entered all the information, and your image will be built. Note: This may take some time, as all your packages and dependencies need to be built to ensure it will work!
After the image build is complete, your image is ready to use in creating a new resource.
Advanced: GPU Images
Saturn supports instances with T4 GPUs (g4dn), as well as instances with V100 GPUs (including p3.16xlarge which has 8 V100 GPUs). These instances must be paired with GPU images, which means the images contain libraries that run on GPU hardware. Otherwise there will be no CUDA drivers available, and you won’t be able to use the GPU card. Saturn offers a default saturn-gpu image, which includes common GPU utilities for machine learning including RAPIDS, PyTorch and Tensorflow/Keras.
If you are building your own custom image, you’ll want to take this into account.
Tensorflow
Tensorflow has GPU specific versions. In pip, call for tensorflow-gpu. In conda, look through the list to find a GPU build.
$ conda search tensorflow
...
#> tensorflow                     2.2.0 eigen_py36h84d285f_0  pkgs/main
#> tensorflow                     2.2.0 eigen_py37h1b16bb3_0  pkgs/main
#> tensorflow                     2.2.0 gpu_py37h1a511ff_0  pkgs/main
#> tensorflow                     2.2.0 gpu_py38hb782248_0  pkgs/main
#> tensorflow                     2.2.0 mkl_py36h5a57954_0  pkgs/main
Then in the image specifications you can ask for:
dependencies:
  - tensorflow=2.2.0=gpu_py37h1a511ff_0
PyTorch
Similarly, PyTorch has GPU versions. Conda is the easiest way to access these. Look for “cuda” in the name, as this indicates GPU support.
$ conda search pytorch
...
#> pytorch                        1.5.1 py3.7_cpu_0                      pytorch
#> pytorch                        1.5.1 py3.7_cuda10.1.243_cudnn7.6.3_0  pytorch
#> pytorch                        1.5.1 py3.7_cuda10.2.89_cudnn7.6.5_0   pytorch
#> pytorch                        1.5.1 py3.7_cuda9.2.148_cudnn7.6.3_0   pytorch
#> pytorch                        1.5.1 py3.8_cpu_0                      pytorch
#> pytorch                        1.5.1 py3.8_cuda10.1.243_cudnn7.6.3_0  pytorch
#> pytorch                        1.5.1 py3.8_cuda10.2.89_cudnn7.6.5_0   pytorch
You have to consider the CUDA version and the Python version here. This example shows selecting CUDA 10.1.
channels:
  - pytorch
  - defaults
dependencies:
  - pytorch=1.5.1=py3.7_cuda10.1.243_cudnn7.6.3_0
RAPIDS
Like PyTorch, for RAPIDS you need to specify the CUDA version. You can get this from the rapidsai conda channel.
channels:
  - rapidsai
  - defaults
dependencies:
  - rapids=0.14.1=cuda10.1_py37_0
Need help, or have more questions? Contact us at:
- support@saturncloud.io
- On Intercom, using the icon at the bottom right corner of the screen
We'll be happy to help you and answer your questions!
